作业尽量自己完成,实在觉得有困难的,再来查看本篇内容
用户服务
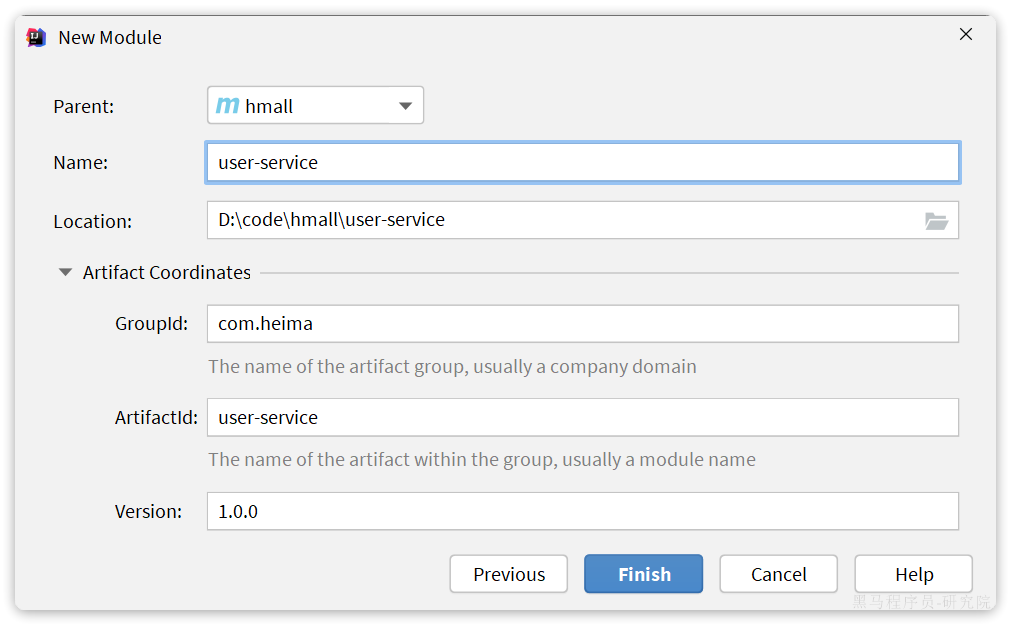
创建项目
在 hmall 下新建一个 module,命名为 user-service:
依赖
user-service 的 pom.xml 文件内容如下:
1
2
3
4
5
6
7
8
9
10
11
12
13
14
15
16
17
18
19
20
21
22
23
24
25
26
27
28
29
30
31
32
33
34
35
36
37
38
39
40
41
42
43
44
45
46
47
48
49
50
51
52
53
54
55
56
57
58
59
60
61
62
| <?xml version="1.0" encoding="UTF-8"?>
<project xmlns="http://maven.apache.org/POM/4.0.0"
xmlns:xsi="http://www.w3.org/2001/XMLSchema-instance"
xsi:schemaLocation="http://maven.apache.org/POM/4.0.0 http://maven.apache.org/xsd/maven-4.0.0.xsd">
<parent>
<artifactId>hmall</artifactId>
<groupId>com.heima</groupId>
<version>1.0.0</version>
</parent>
<modelVersion>4.0.0</modelVersion>
<artifactId>user-service</artifactId>
<properties>
<maven.compiler.source>11</maven.compiler.source>
<maven.compiler.target>11</maven.compiler.target>
</properties>
<dependencies>
<dependency>
<groupId>com.heima</groupId>
<artifactId>hm-common</artifactId>
<version>1.0.0</version>
</dependency>
<dependency>
<groupId>com.heima</groupId>
<artifactId>hm-api</artifactId>
<version>1.0.0</version>
</dependency>
<dependency>
<groupId>org.springframework.boot</groupId>
<artifactId>spring-boot-starter-web</artifactId>
</dependency>
<dependency>
<groupId>mysql</groupId>
<artifactId>mysql-connector-java</artifactId>
</dependency>
<dependency>
<groupId>com.baomidou</groupId>
<artifactId>mybatis-plus-boot-starter</artifactId>
</dependency>
<dependency>
<groupId>com.alibaba.cloud</groupId>
<artifactId>spring-cloud-starter-alibaba-nacos-discovery</artifactId>
</dependency>
</dependencies>
<build>
<finalName>${project.artifactId}</finalName>
<plugins>
<plugin>
<groupId>org.springframework.boot</groupId>
<artifactId>spring-boot-maven-plugin</artifactId>
</plugin>
</plugins>
</build>
</project>
|
启动类
在 user-service 中的 com.hmall.user 包下创建启动类:
1
2
3
4
5
6
7
8
9
10
11
12
13
| package com.hmall.user;
import org.mybatis.spring.annotation.MapperScan;
import org.springframework.boot.SpringApplication;
import org.springframework.boot.autoconfigure.SpringBootApplication;
@MapperScan("com.hmall.user.mapper")
@SpringBootApplication
public class UserApplication {
public static void main(String[] args) {
SpringApplication.run(UserApplication.class, args);
}
}
|
配置文件
从 hm-service 项目中复制 3 个 yaml 配置文件到 user-service 的 resource 目录。
其中 application-dev.yaml 和 application-local.yaml 保持不变。application.yaml 如下:
1
2
3
4
5
6
7
8
9
10
11
12
13
14
15
16
17
18
19
20
21
22
23
24
25
26
27
28
29
30
31
32
33
34
35
36
37
38
39
40
41
42
43
44
45
46
47
48
49
50
| server:
port: 8084
spring:
application:
name: user-service
profiles:
active: dev
datasource:
url: jdbc:mysql://${hm.db.host}:3306/hm-user?useUnicode=true&characterEncoding=UTF-8&autoReconnect=true&serverTimezone=Asia/Shanghai
driver-class-name: com.mysql.cj.jdbc.Driver
username: root
password: ${hm.db.pw}
cloud:
nacos:
server-addr: 192.168.150.101
mybatis-plus:
configuration:
default-enum-type-handler: com.baomidou.mybatisplus.core.handlers.MybatisEnumTypeHandler
global-config:
db-config:
update-strategy: not_null
id-type: auto
logging:
level:
com.hmall: debug
pattern:
dateformat: HH:mm:ss:SSS
file:
path: "logs/${spring.application.name}"
knife4j:
enable: true
openapi:
title: 用户服务接口文档
description: "信息"
email: zhanghuyi@itcast.cn
concat: 虎哥
url: https://www.itcast.cn
version: v1.0.0
group:
default:
group-name: default
api-rule: package
api-rule-resources:
- com.hmall.user.controller
hm:
jwt:
location: classpath:hmall.jks
alias: hmall
password: hmall123
tokenTTL: 30m
|
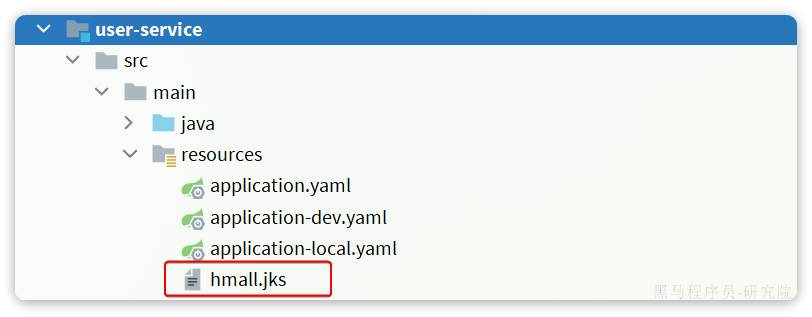
将 hm-service 下的 hmall.jks 文件拷贝到 user-service 下的 resources 目录,这是 JWT 加密的秘钥文件:
代码
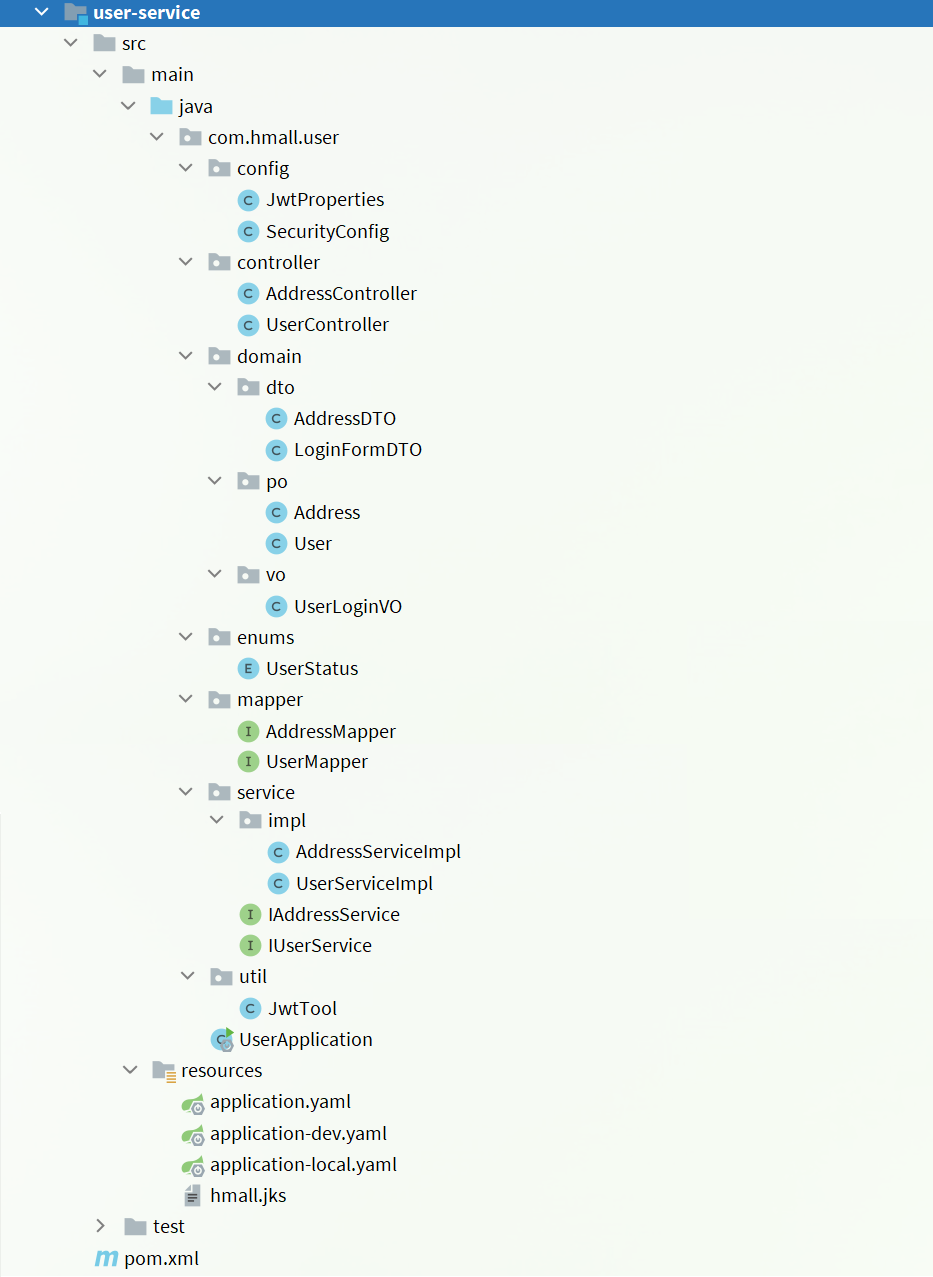
复制 hm-service 中所有与 user、address、jwt 有关的代码,最终项目结构如下:
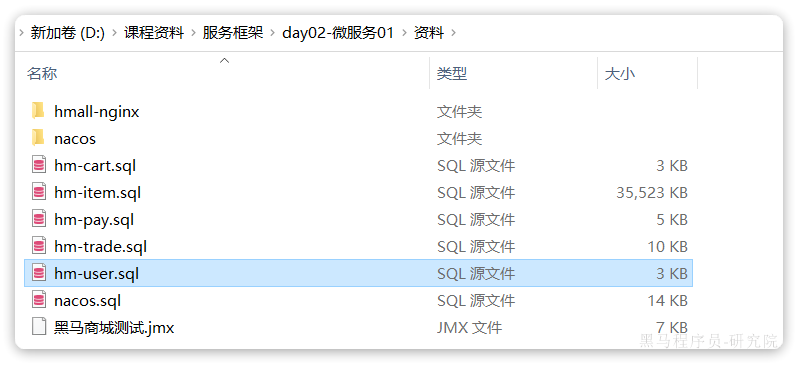
数据库
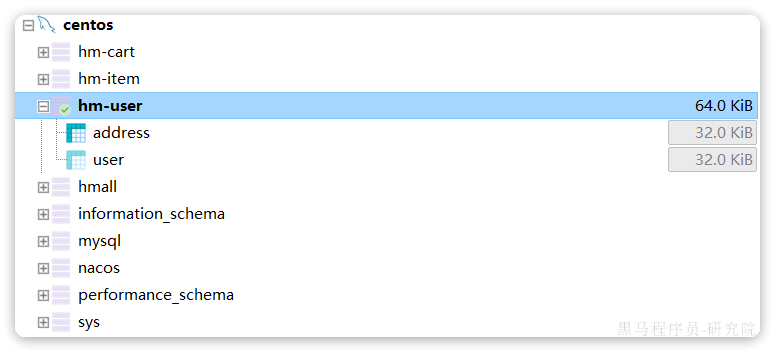
user-service 也需要自己的独立的 database,向 MySQL 中导入课前资料提供的 SQL:
导入结果如下:
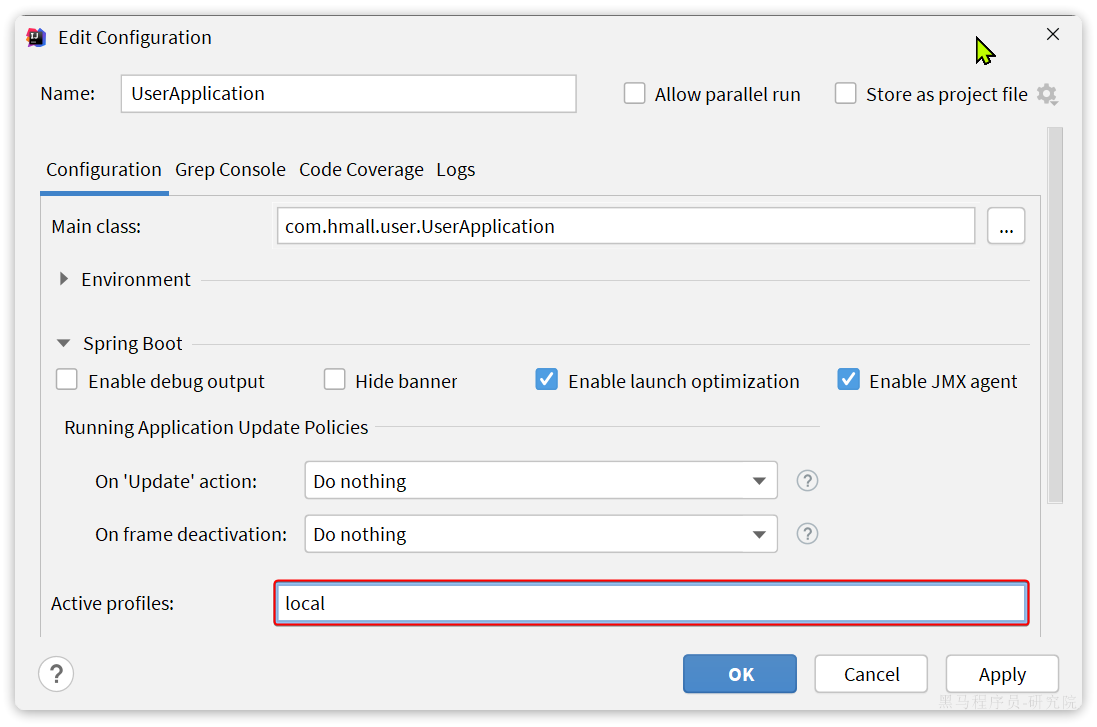
配置启动项
给 user-service 配置启动项,设置 profile 为 local:
测试
启动 UserApplication,访问 http://localhost:8084/doc.html#/default/用户相关接口/loginUsingPOST,测试登录接口:
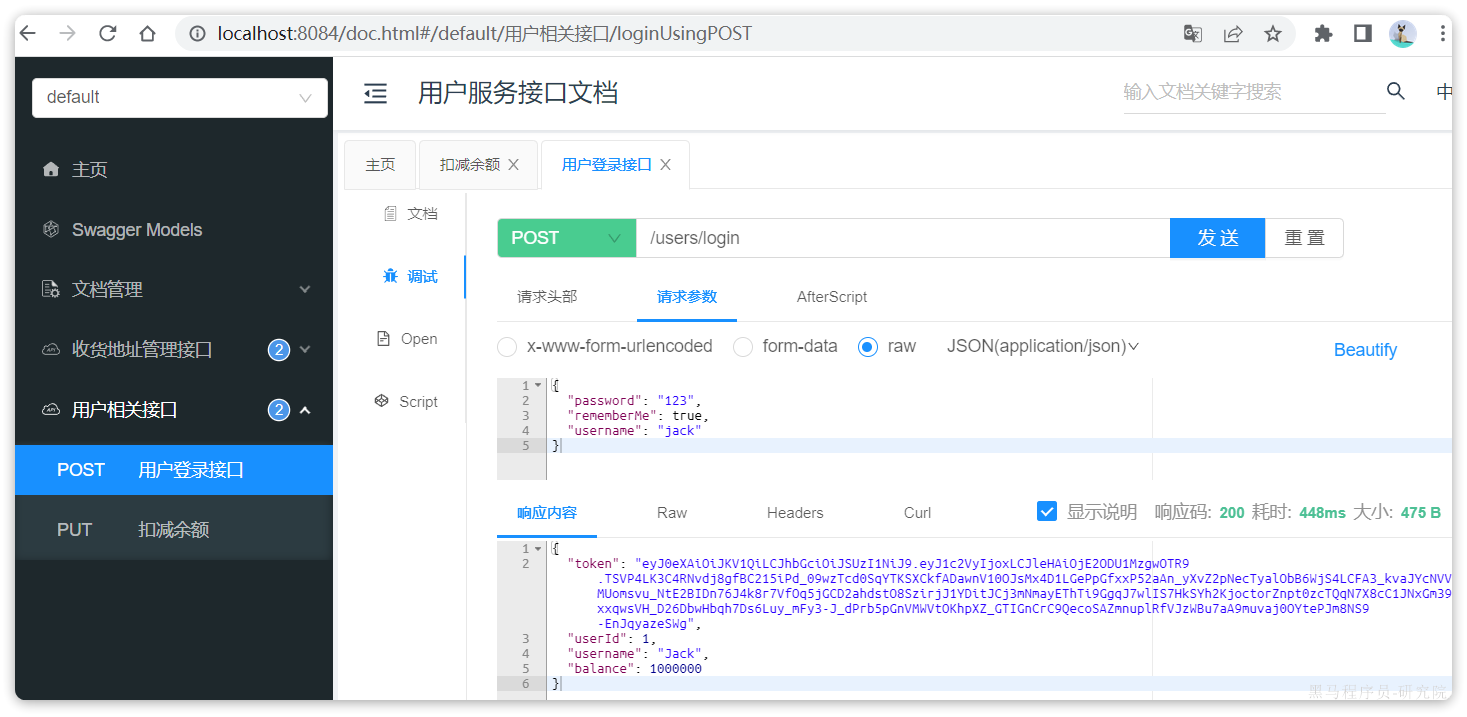
用户服务测试通过。
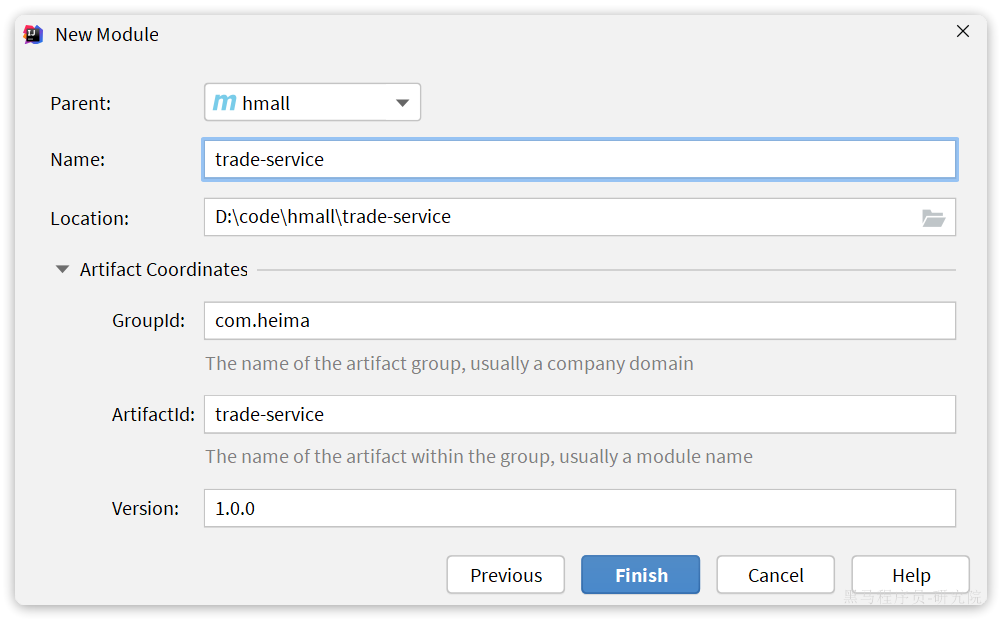
交易服务
创建项目
在 hmall 下新建一个 module,命名为 trade-service:
依赖
trade-service 的 pom.xml 文件内容如下:
1
2
3
4
5
6
7
8
9
10
11
12
13
14
15
16
17
18
19
20
21
22
23
24
25
26
27
28
29
30
31
32
33
34
35
36
37
38
39
40
41
42
43
44
45
46
47
48
49
50
51
52
53
54
55
56
57
58
59
60
61
62
| <?xml version="1.0" encoding="UTF-8"?>
<project xmlns="http://maven.apache.org/POM/4.0.0"
xmlns:xsi="http://www.w3.org/2001/XMLSchema-instance"
xsi:schemaLocation="http://maven.apache.org/POM/4.0.0 http://maven.apache.org/xsd/maven-4.0.0.xsd">
<parent>
<artifactId>hmall</artifactId>
<groupId>com.heima</groupId>
<version>1.0.0</version>
</parent>
<modelVersion>4.0.0</modelVersion>
<artifactId>trade-service</artifactId>
<properties>
<maven.compiler.source>11</maven.compiler.source>
<maven.compiler.target>11</maven.compiler.target>
</properties>
<dependencies>
<dependency>
<groupId>com.heima</groupId>
<artifactId>hm-common</artifactId>
<version>1.0.0</version>
</dependency>
<dependency>
<groupId>com.heima</groupId>
<artifactId>hm-api</artifactId>
<version>1.0.0</version>
</dependency>
<dependency>
<groupId>org.springframework.boot</groupId>
<artifactId>spring-boot-starter-web</artifactId>
</dependency>
<dependency>
<groupId>mysql</groupId>
<artifactId>mysql-connector-java</artifactId>
</dependency>
<dependency>
<groupId>com.baomidou</groupId>
<artifactId>mybatis-plus-boot-starter</artifactId>
</dependency>
<dependency>
<groupId>com.alibaba.cloud</groupId>
<artifactId>spring-cloud-starter-alibaba-nacos-discovery</artifactId>
</dependency>
</dependencies>
<build>
<finalName>${project.artifactId}</finalName>
<plugins>
<plugin>
<groupId>org.springframework.boot</groupId>
<artifactId>spring-boot-maven-plugin</artifactId>
</plugin>
</plugins>
</build>
</project>
|
启动类
在 trade-service 中的 com.hmall.trade 包下创建启动类:
1
2
3
4
5
6
7
8
9
10
11
12
13
14
15
| package com.hmall.trade;
import org.mybatis.spring.annotation.MapperScan;
import org.springframework.boot.SpringApplication;
import org.springframework.boot.autoconfigure.SpringBootApplication;
import org.springframework.cloud.openfeign.EnableFeignClients;
@EnableFeignClients(basePackages = "com.hmall.api.client", defaultConfiguration = DefaultFeignConfig.class)
@MapperScan("com.hmall.trade.mapper")
@SpringBootApplication
public class TradeApplication {
public static void main(String[] args) {
SpringApplication.run(TradeApplication.class, args);
}
}
|
配置文件
从 hm-service 项目中复制 3 个 yaml 配置文件到 trade-service 的 resource 目录。
其中 application-dev.yaml 和 application-local.yaml 保持不变。application.yaml 如下:
1
2
3
4
5
6
7
8
9
10
11
12
13
14
15
16
17
18
19
20
21
22
23
24
25
26
27
28
29
30
31
32
33
34
35
36
37
38
39
40
41
42
43
44
| server:
port: 8085
spring:
application:
name: trade-service
profiles:
active: dev
datasource:
url: jdbc:mysql://${hm.db.host}:3306/hm-trade?useUnicode=true&characterEncoding=UTF-8&autoReconnect=true&serverTimezone=Asia/Shanghai
driver-class-name: com.mysql.cj.jdbc.Driver
username: root
password: ${hm.db.pw}
cloud:
nacos:
server-addr: 192.168.150.101
mybatis-plus:
configuration:
default-enum-type-handler: com.baomidou.mybatisplus.core.handlers.MybatisEnumTypeHandler
global-config:
db-config:
update-strategy: not_null
id-type: auto
logging:
level:
com.hmall: debug
pattern:
dateformat: HH:mm:ss:SSS
file:
path: "logs/${spring.application.name}"
knife4j:
enable: true
openapi:
title: 交易服务接口文档
description: "信息"
email: zhanghuyi@itcast.cn
concat: 虎哥
url: https://www.itcast.cn
version: v1.0.0
group:
default:
group-name: default
api-rule: package
api-rule-resources:
- com.hmall.trade.controller
|
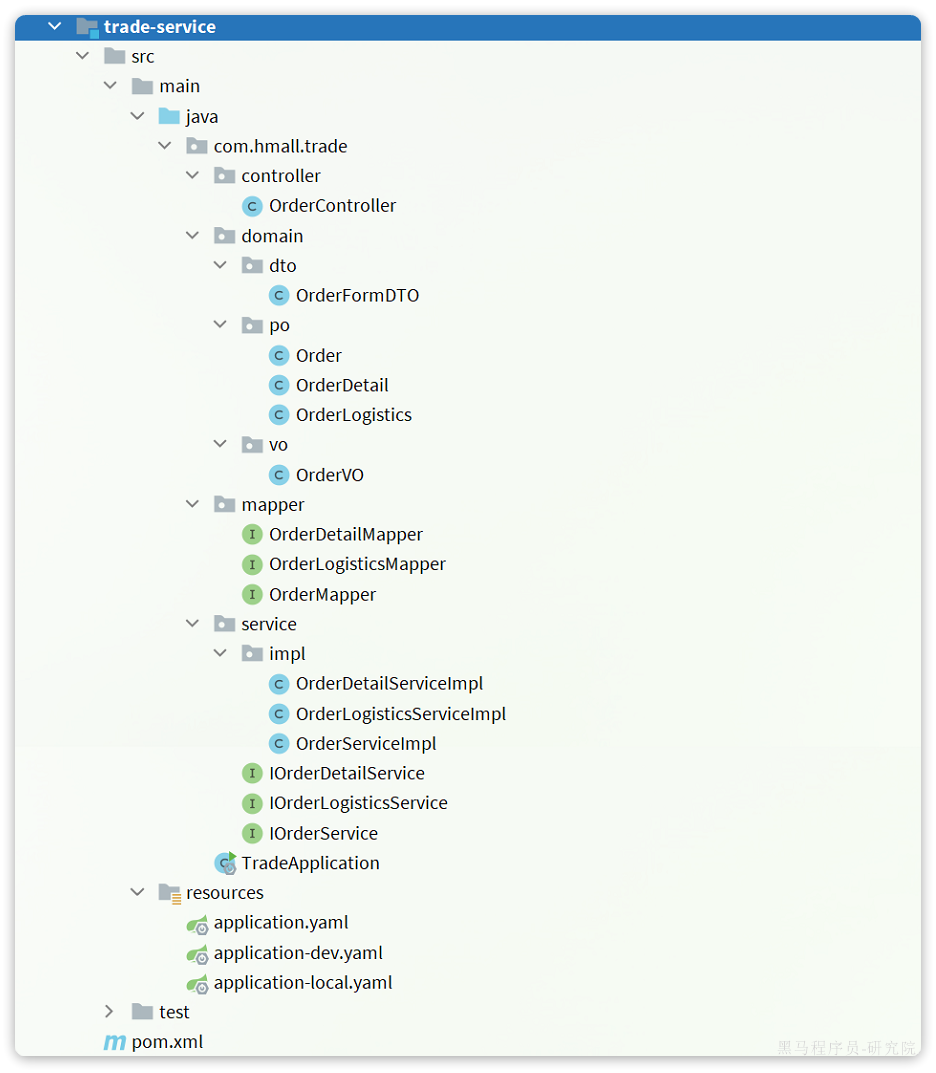
代码
基础代码
复制 hm-service 中所有与 trade 有关的代码,最终项目结构如下:
在交易服务中,用户下单时需要做下列事情:
- 根据 id 查询商品列表
- 计算商品总价
- 保存订单
- 扣减库存
- 清理购物车商品
其中,查询商品、扣减库存都是与商品有关的业务,在 item-service 中有相关功能;清理购物车商品是购物车业务,在 cart-service 中有相关功能。
因此交易服务要调用他们,必须通过 OpenFeign 远程调用。我们需要将上述功能抽取为 FeignClient.
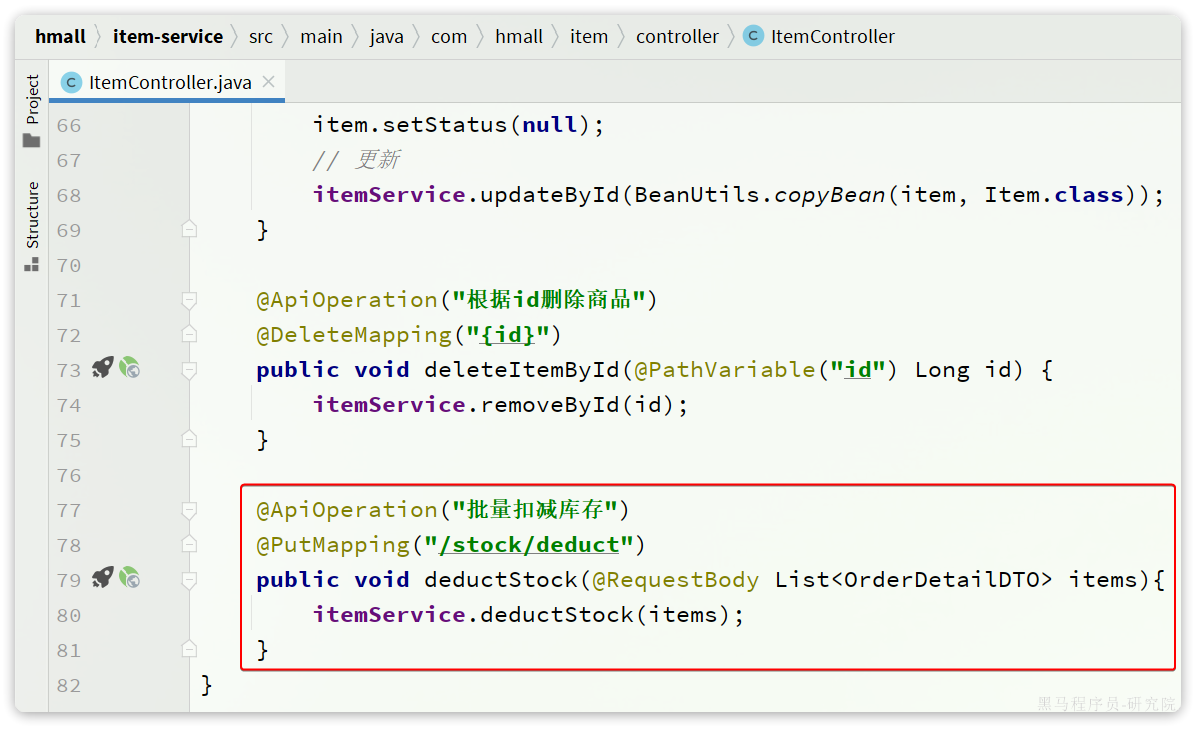
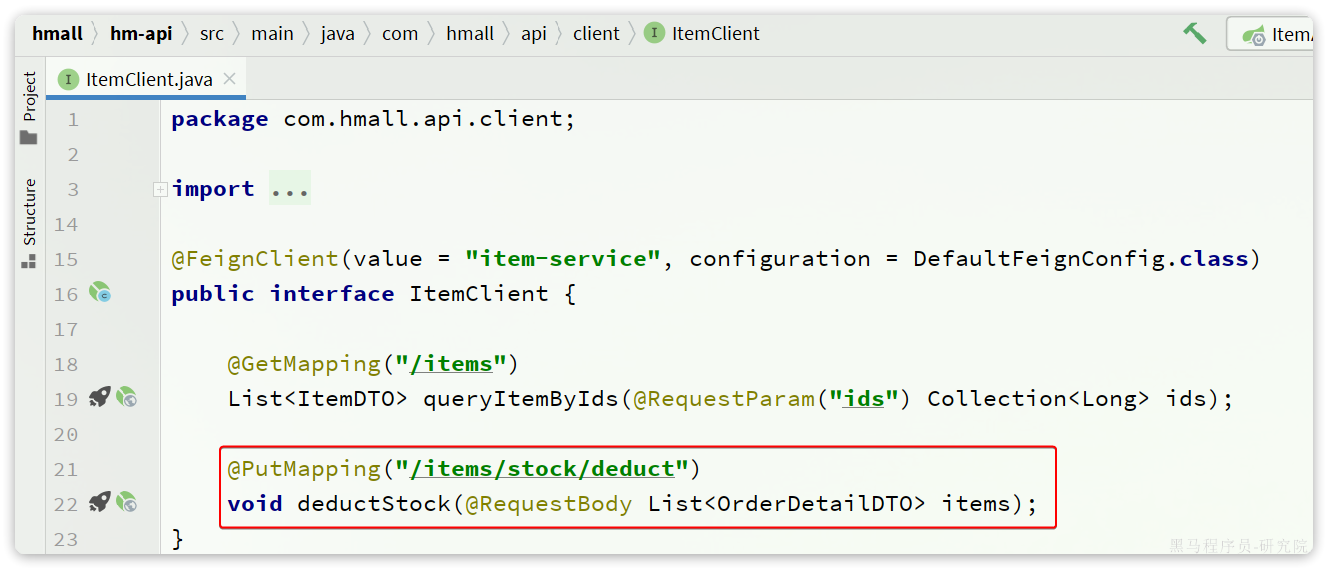
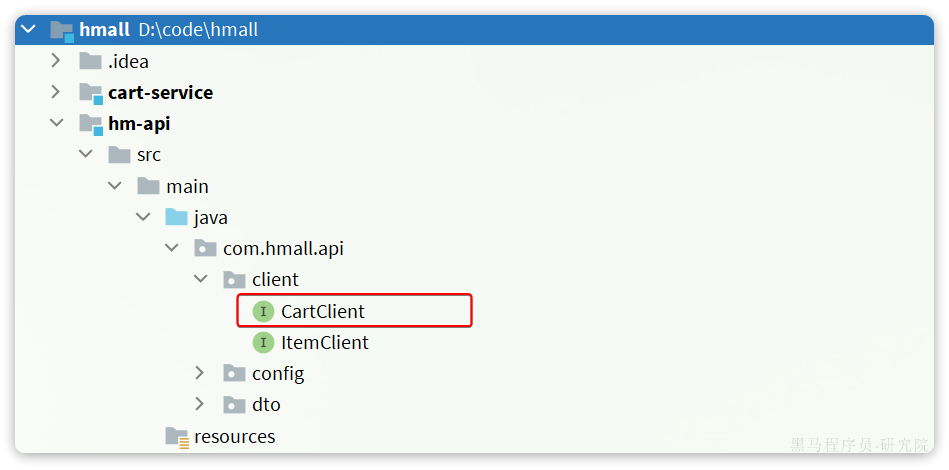
抽取 ItemClient 接口
首先是扣减库存,在 item-service 中的对应业务接口如下:
我们将这个接口抽取到 hm-api 模块的 com.hmall.api.client.ItemClient 中:
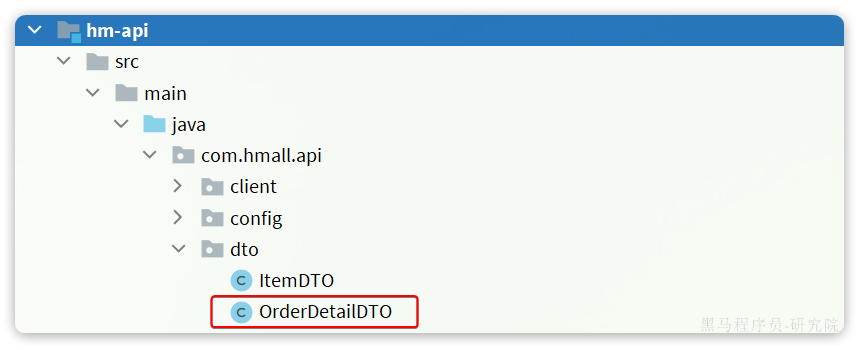
将接口参数的 OrderDetailDTO 抽取到 hm-api 模块的 com.hmall.api.dto 包下:
抽取 CartClient 接口
接下来是清理购物车商品,在 cart-service 中的对应业务接口如下:
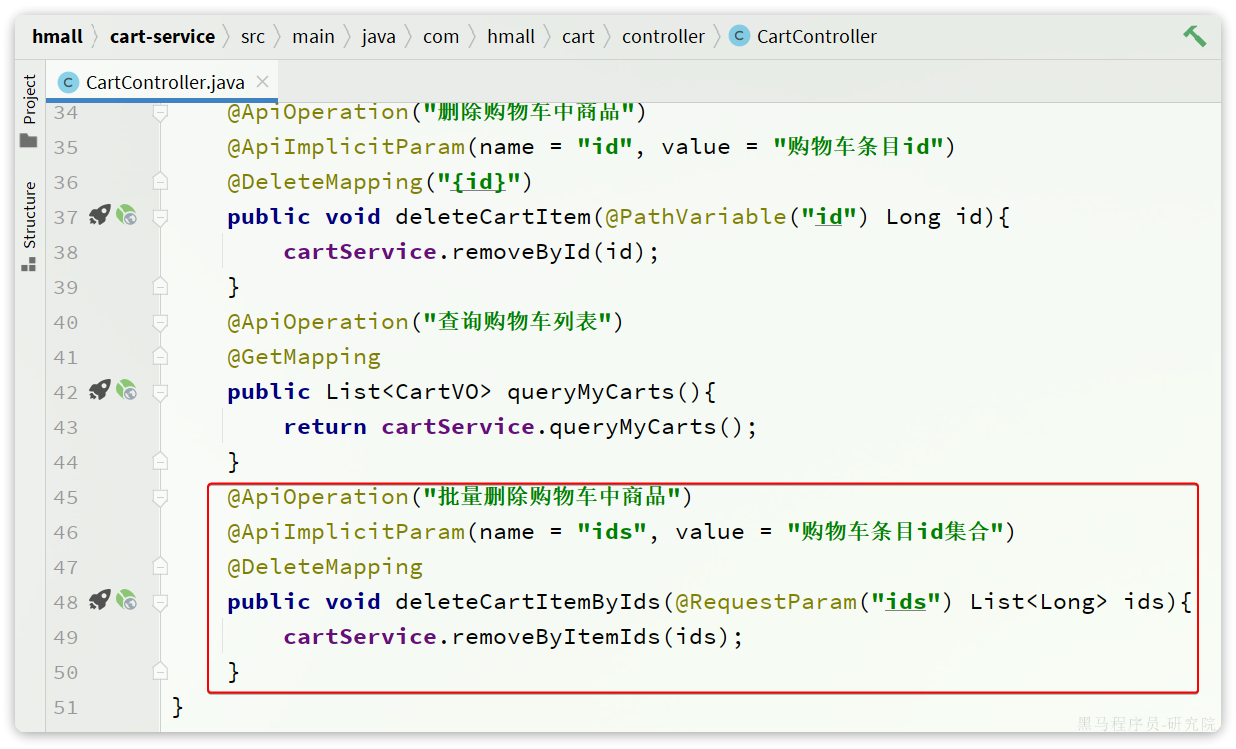
我们在 hm-api 模块的 com.hmall.api.client 包下定义一个 CartClient 接口:
代码如下:
1
2
3
4
5
6
7
8
9
10
11
12
13
| package com.hmall.api.client;
import org.springframework.cloud.openfeign.FeignClient;
import org.springframework.web.bind.annotation.DeleteMapping;
import org.springframework.web.bind.annotation.RequestParam;
import java.util.Collection;
@FeignClient("cart-service")
public interface CartClient {
@DeleteMapping("/carts")
void deleteCartItemByIds(@RequestParam("ids") Collection<Long> ids);
}
|
改造 OrderServiceImpl
接下来,就可以改造 OrderServiceImpl 中的逻辑,将本地方法调用改造为基于 FeignClient 的调用,完整代码如下:
1
2
3
4
5
6
7
8
9
10
11
12
13
14
15
16
17
18
19
20
21
22
23
24
25
26
27
28
29
30
31
32
33
34
35
36
37
38
39
40
41
42
43
44
45
46
47
48
49
50
51
52
53
54
55
56
57
58
59
60
61
62
63
64
65
66
67
68
69
70
71
72
73
74
75
76
77
78
79
80
81
82
83
84
85
86
87
88
89
90
91
92
93
94
95
96
97
98
99
| package com.hmall.trade.service.impl;
import com.baomidou.mybatisplus.extension.service.impl.ServiceImpl;
import com.hmall.api.client.CartClient;
import com.hmall.api.client.ItemClient;
import com.hmall.api.dto.ItemDTO;
import com.hmall.api.dto.OrderDetailDTO;
import com.hmall.common.exception.BadRequestException;
import com.hmall.common.utils.UserContext;
import com.hmall.trade.domain.dto.OrderFormDTO;
import com.hmall.trade.domain.po.Order;
import com.hmall.trade.domain.po.OrderDetail;
import com.hmall.trade.mapper.OrderMapper;
import com.hmall.trade.service.IOrderDetailService;
import com.hmall.trade.service.IOrderService;
import lombok.RequiredArgsConstructor;
import org.springframework.stereotype.Service;
import org.springframework.transaction.annotation.Transactional;
import java.util.ArrayList;
import java.util.List;
import java.util.Map;
import java.util.Set;
import java.util.stream.Collectors;
|
数据库
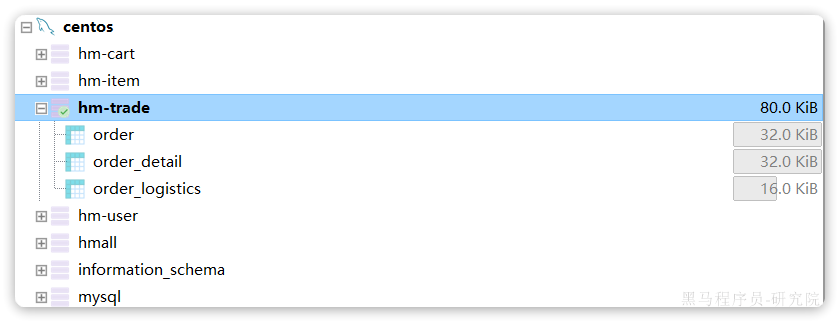
trade-service 也需要自己的独立的 database,向 MySQL 中导入课前资料提供的 SQL:

导入结果如下:
配置启动项
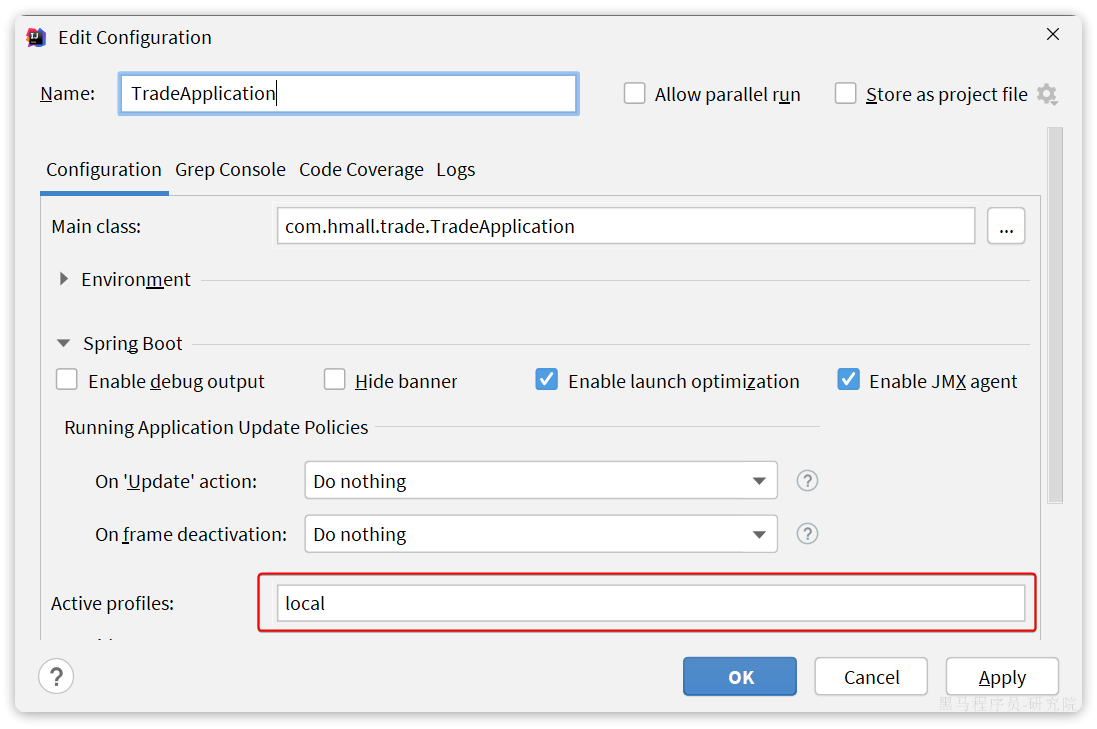
给 trade-service 配置启动项,设置 profile 为 local:
测试
启动 TradeApplication,访问 http://localhost:8085/doc.html,测试查询订单接口:
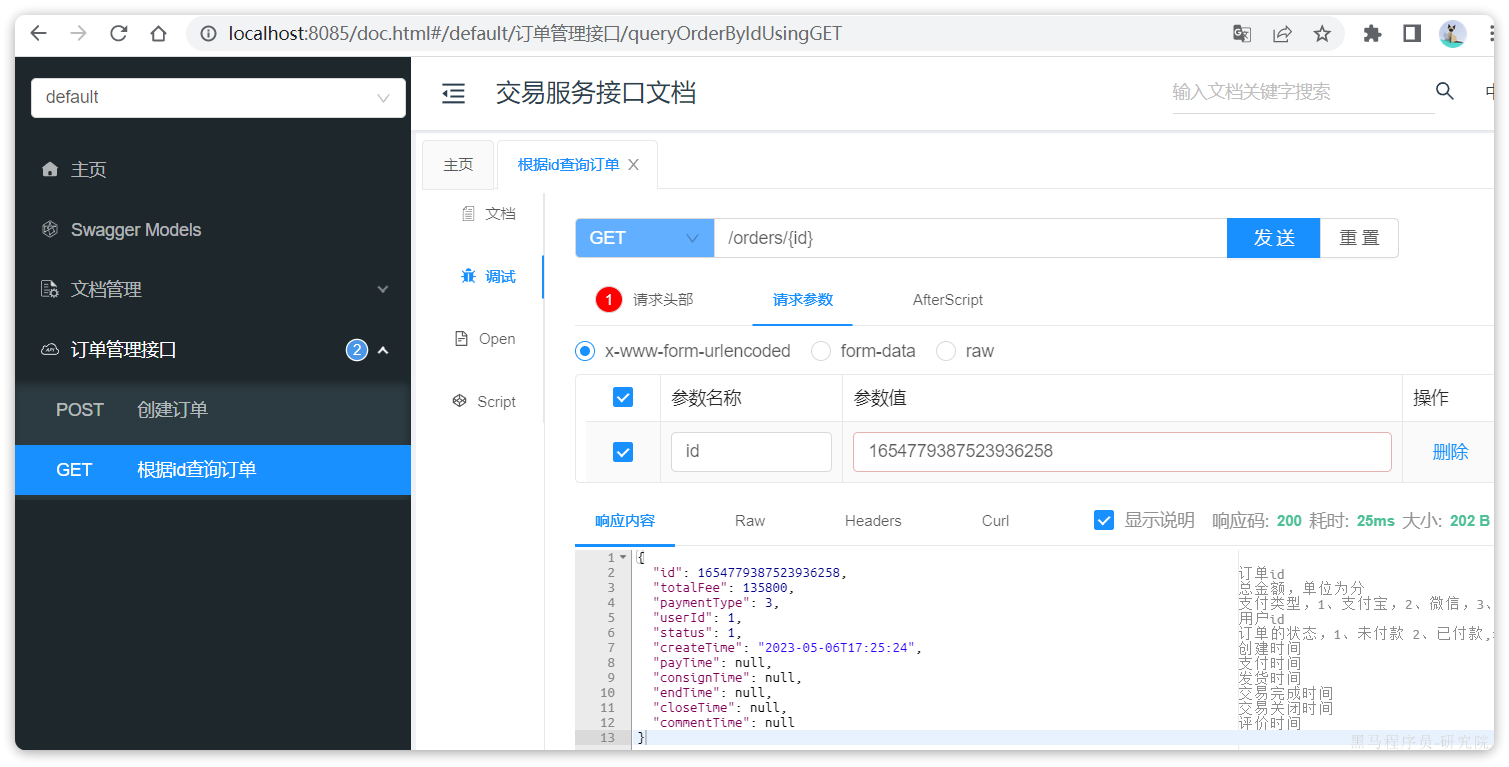
请求参数:1654779387523936258,交易服务测试通过。
注意,创建订单接口无法测试,因为无法获取登录用户信息。
支付服务
创建项目
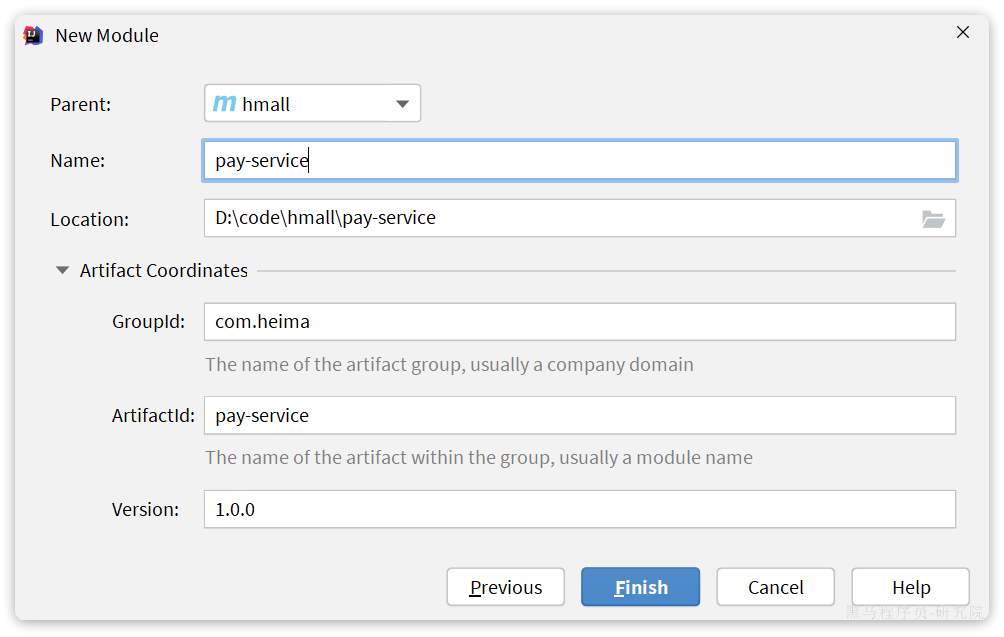
在 hmall 下新建一个 module,命名为 pay-service:
依赖
pay-service 的 pom.xml 文件内容如下:
1
2
3
4
5
6
7
8
9
10
11
12
13
14
15
16
17
18
19
20
21
22
23
24
25
26
27
28
29
30
31
32
33
34
35
36
37
38
39
40
41
42
43
44
45
46
47
48
49
50
51
52
53
54
55
56
57
58
59
60
61
62
| <?xml version="1.0" encoding="UTF-8"?>
<project xmlns="http://maven.apache.org/POM/4.0.0"
xmlns:xsi="http://www.w3.org/2001/XMLSchema-instance"
xsi:schemaLocation="http://maven.apache.org/POM/4.0.0 http://maven.apache.org/xsd/maven-4.0.0.xsd">
<parent>
<artifactId>hmall</artifactId>
<groupId>com.heima</groupId>
<version>1.0.0</version>
</parent>
<modelVersion>4.0.0</modelVersion>
<artifactId>pay-service</artifactId>
<properties>
<maven.compiler.source>11</maven.compiler.source>
<maven.compiler.target>11</maven.compiler.target>
</properties>
<dependencies>
<dependency>
<groupId>com.heima</groupId>
<artifactId>hm-common</artifactId>
<version>1.0.0</version>
</dependency>
<dependency>
<groupId>com.heima</groupId>
<artifactId>hm-api</artifactId>
<version>1.0.0</version>
</dependency>
<dependency>
<groupId>org.springframework.boot</groupId>
<artifactId>spring-boot-starter-web</artifactId>
</dependency>
<dependency>
<groupId>mysql</groupId>
<artifactId>mysql-connector-java</artifactId>
</dependency>
<dependency>
<groupId>com.baomidou</groupId>
<artifactId>mybatis-plus-boot-starter</artifactId>
</dependency>
<dependency>
<groupId>com.alibaba.cloud</groupId>
<artifactId>spring-cloud-starter-alibaba-nacos-discovery</artifactId>
</dependency>
</dependencies>
<build>
<finalName>${project.artifactId}</finalName>
<plugins>
<plugin>
<groupId>org.springframework.boot</groupId>
<artifactId>spring-boot-maven-plugin</artifactId>
</plugin>
</plugins>
</build>
</project>
|
启动类
在 pay-service 中的 com.hmall.pay 包下创建启动类:
1
2
3
4
5
6
7
8
9
10
11
12
13
14
15
| package com.hmall.pay;
import org.mybatis.spring.annotation.MapperScan;
import org.springframework.boot.SpringApplication;
import org.springframework.boot.autoconfigure.SpringBootApplication;
import org.springframework.cloud.openfeign.EnableFeignClients;
@EnableFeignClients(basePackages = "com.hmall.api.client", defaultConfiguration = DefaultFeignConfig.class)
@MapperScan("com.hmall.pay.mapper")
@SpringBootApplication
public class PayApplication {
public static void main(String[] args) {
SpringApplication.run(PayApplication.class, args);
}
}
|
配置文件
从 hm-service 项目中复制 3 个 yaml 配置文件到 trade-service 的 resource 目录。
其中 application-dev.yaml 和 application-local.yaml 保持不变。application.yaml 如下:
1
2
3
4
5
6
7
8
9
10
11
12
13
14
15
16
17
18
19
20
21
22
23
24
25
26
27
28
29
30
31
32
33
34
35
36
37
38
39
40
41
42
43
44
| server:
port: 8086
spring:
application:
name: pay-service
profiles:
active: dev
datasource:
url: jdbc:mysql://${hm.db.host}:3306/hm-pay?useUnicode=true&characterEncoding=UTF-8&autoReconnect=true&serverTimezone=Asia/Shanghai
driver-class-name: com.mysql.cj.jdbc.Driver
username: root
password: ${hm.db.pw}
cloud:
nacos:
server-addr: 192.168.150.101
mybatis-plus:
configuration:
default-enum-type-handler: com.baomidou.mybatisplus.core.handlers.MybatisEnumTypeHandler
global-config:
db-config:
update-strategy: not_null
id-type: auto
logging:
level:
com.hmall: debug
pattern:
dateformat: HH:mm:ss:SSS
file:
path: "logs/${spring.application.name}"
knife4j:
enable: true
openapi:
title: 支付服务接口文档
description: "支付服务接口文档"
email: zhanghuyi@itcast.cn
concat: 虎哥
url: https://www.itcast.cn
version: v1.0.0
group:
default:
group-name: default
api-rule: package
api-rule-resources:
- com.hmall.pay.controller
|
代码
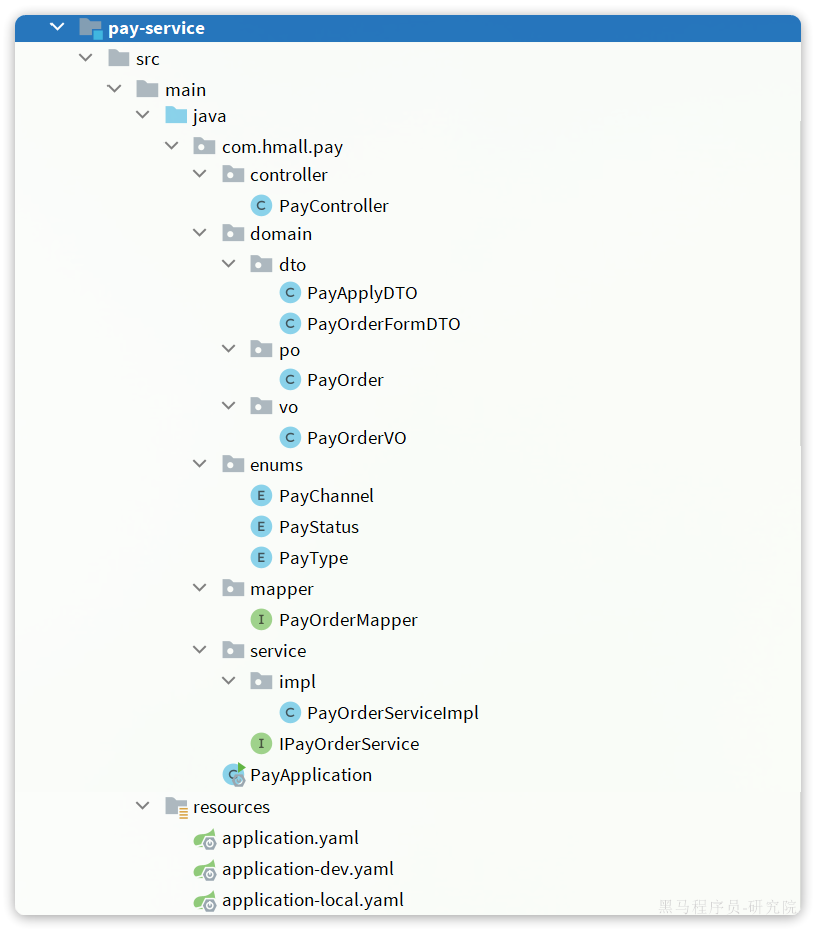
基础代码
复制 hm-service 中所有与支付有关的代码,最终项目结构如下:
在支付服务中,基于用户余额支付时需要做下列事情:
- 扣减用户余额
- 标记支付单状态为已支付
- 标记订单状态为已支付
其中,扣减用户余额是在 user-service 中有相关功能;标记订单状态则是在 trade-service 中有相关功能。因此交易服务要调用他们,必须通过 OpenFeign 远程调用。我们需要将上述功能抽取为 FeignClient.
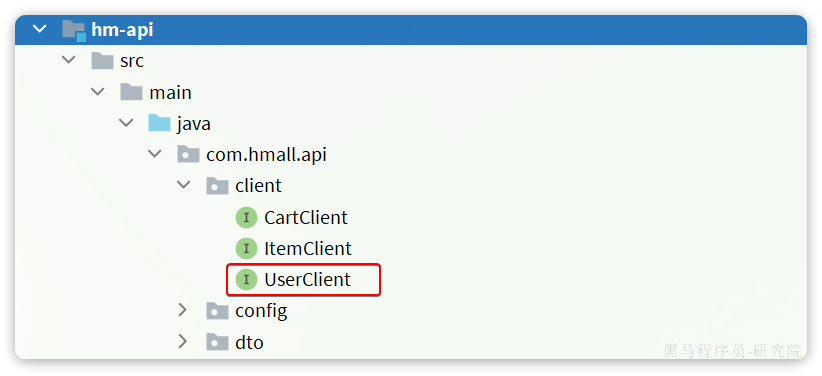
抽取 UserClient 接口
首先是扣减用户余额,在 user-service 中的对应业务接口如下:
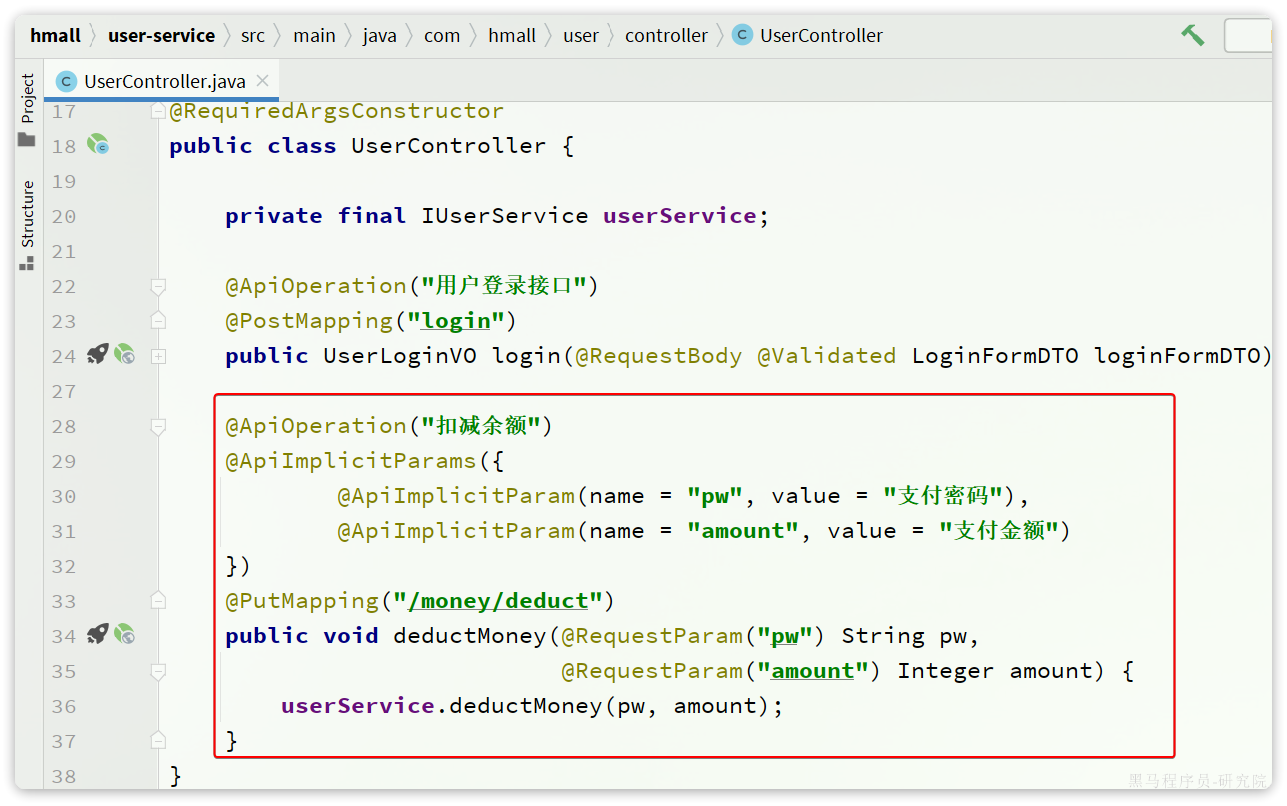
我们将这个接口抽取到 hm-api 模块的 com.hmall.api.client.UserClient 中:
具体代码如下:
1
2
3
4
5
6
7
8
9
10
11
| package com.hmall.api.client;
import org.springframework.cloud.openfeign.FeignClient;
import org.springframework.web.bind.annotation.PutMapping;
import org.springframework.web.bind.annotation.RequestParam;
@FeignClient("user-service")
public interface UserClient {
@PutMapping("/users/money/deduct")
void deductMoney(@RequestParam("pw") String pw,@RequestParam("amount") Integer amount);
}
|
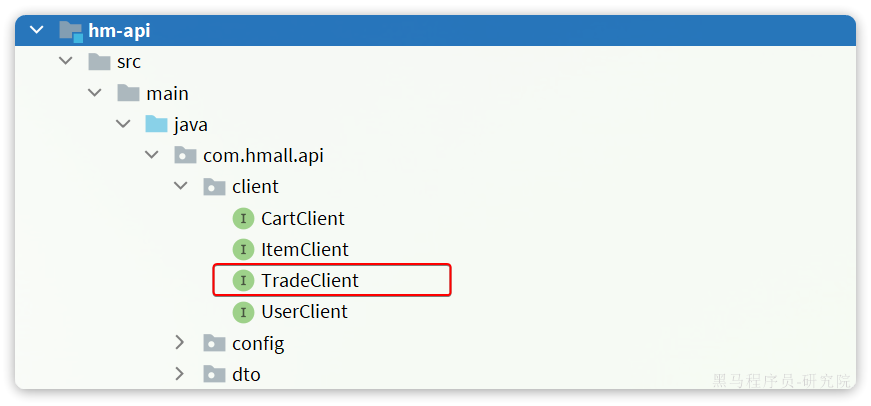
抽取 TradeClient 接口
接下来是标记订单状态,在 trade-service 中的对应业务接口如下:
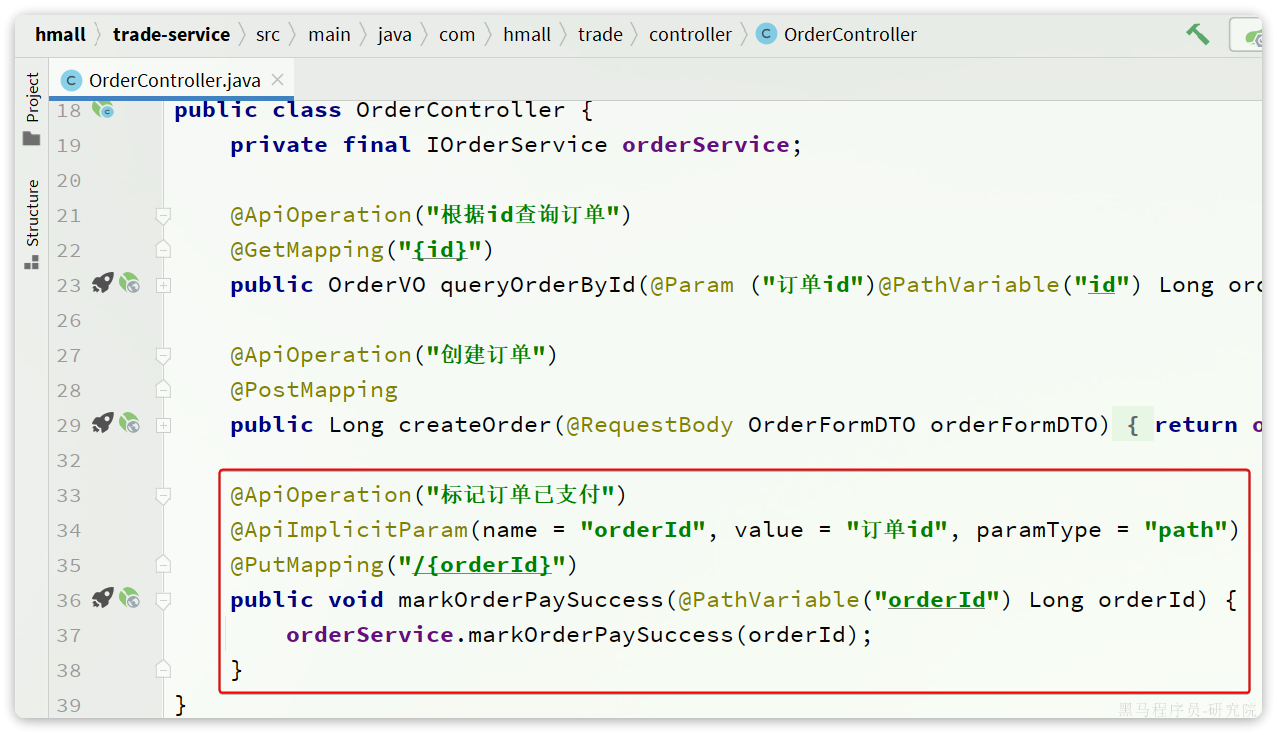
我们将这个接口抽取到 hm-api 模块的 com.hmall.api.client.TradeClient 中:
代码如下:
1
2
3
4
5
6
7
8
9
10
11
| package com.hmall.api.client;
import org.springframework.cloud.openfeign.FeignClient;
import org.springframework.web.bind.annotation.PathVariable;
import org.springframework.web.bind.annotation.PutMapping;
@FeignClient("trade-service")
public interface TradeClient {
@PutMapping("/orders/{orderId}")
void markOrderPaySuccess(@PathVariable("orderId") Long orderId);
}
|
改造 PayOrderServiceImpl
接下来,就可以改造 PayOrderServiceImpl 中的逻辑,将本地方法调用改造为基于 FeignClient 的调用,完整代码如下:
1
2
3
4
5
6
7
8
9
10
11
12
13
14
15
16
17
18
19
20
21
22
23
24
25
26
27
28
29
30
31
32
33
34
35
36
37
38
39
40
41
42
43
44
45
46
47
48
49
50
51
52
53
54
55
56
57
58
59
60
61
62
63
64
65
66
67
68
69
70
71
72
73
74
75
76
77
78
79
80
81
82
83
84
85
86
87
88
89
90
91
92
93
94
95
96
97
98
99
100
101
102
103
104
105
106
107
108
109
110
111
112
113
114
115
116
117
118
119
120
121
122
123
124
125
126
| package com.hmall.pay.service.impl;
import com.baomidou.mybatisplus.core.toolkit.IdWorker;
import com.baomidou.mybatisplus.core.toolkit.StringUtils;
import com.baomidou.mybatisplus.extension.service.impl.ServiceImpl;
import com.hmall.api.client.TradeClient;
import com.hmall.api.client.UserClient;
import com.hmall.common.exception.BizIllegalException;
import com.hmall.common.utils.BeanUtils;
import com.hmall.common.utils.UserContext;
import com.hmall.pay.domain.dto.PayApplyDTO;
import com.hmall.pay.domain.dto.PayOrderFormDTO;
import com.hmall.pay.domain.po.PayOrder;
import com.hmall.pay.enums.PayStatus;
import com.hmall.pay.mapper.PayOrderMapper;
import com.hmall.pay.service.IPayOrderService;
import lombok.RequiredArgsConstructor;
import org.springframework.stereotype.Service;
import org.springframework.transaction.annotation.Transactional;
import java.time.LocalDateTime;
@Service
@RequiredArgsConstructor
public class PayOrderServiceImpl extends ServiceImpl<PayOrderMapper, PayOrder> implements IPayOrderService {
private final UserClient userClient;
private final TradeClient tradeClient;
@Override
public String applyPayOrder(PayApplyDTO applyDTO) {
PayOrder payOrder = checkIdempotent(applyDTO);
return payOrder.getId().toString();
}
@Override
@Transactional
public void tryPayOrderByBalance(PayOrderFormDTO payOrderDTO) {
PayOrder po = getById(payOrderDTO.getId());
if(!PayStatus.WAIT_BUYER_PAY.equalsValue(po.getStatus())){
throw new BizIllegalException("交易已支付或关闭!");
}
userClient.deductMoney(payOrderDTO.getPw(), po.getAmount());
boolean success = markPayOrderSuccess(payOrderDTO.getId(), LocalDateTime.now());
if (!success) {
throw new BizIllegalException("交易已支付或关闭!");
}
tradeClient.markOrderPaySuccess(po.getBizOrderNo());
}
public boolean markPayOrderSuccess(Long id, LocalDateTime successTime) {
return lambdaUpdate()
.set(PayOrder::getStatus, PayStatus.TRADE_SUCCESS.getValue())
.set(PayOrder::getPaySuccessTime, successTime)
.eq(PayOrder::getId, id)
.in(PayOrder::getStatus, PayStatus.NOT_COMMIT.getValue(), PayStatus.WAIT_BUYER_PAY.getValue())
.update();
}
private PayOrder checkIdempotent(PayApplyDTO applyDTO) {
PayOrder oldOrder = queryByBizOrderNo(applyDTO.getBizOrderNo());
if (oldOrder == null) {
PayOrder payOrder = buildPayOrder(applyDTO);
payOrder.setPayOrderNo(IdWorker.getId());
save(payOrder);
return payOrder;
}
if (PayStatus.TRADE_SUCCESS.equalsValue(oldOrder.getStatus())) {
throw new BizIllegalException("订单已经支付!");
}
if (PayStatus.TRADE_CLOSED.equalsValue(oldOrder.getStatus())) {
throw new BizIllegalException("订单已关闭");
}
if (!StringUtils.equals(oldOrder.getPayChannelCode(), applyDTO.getPayChannelCode())) {
PayOrder payOrder = buildPayOrder(applyDTO);
payOrder.setId(oldOrder.getId());
payOrder.setQrCodeUrl("");
updateById(payOrder);
payOrder.setPayOrderNo(oldOrder.getPayOrderNo());
return payOrder;
}
return oldOrder;
}
private PayOrder buildPayOrder(PayApplyDTO payApplyDTO) {
PayOrder payOrder = BeanUtils.toBean(payApplyDTO, PayOrder.class);
payOrder.setPayOverTime(LocalDateTime.now().plusMinutes(120L));
payOrder.setStatus(PayStatus.WAIT_BUYER_PAY.getValue());
payOrder.setBizUserId(UserContext.getUser());
return payOrder;
}
public PayOrder queryByBizOrderNo(Long bizOrderNo) {
return lambdaQuery()
.eq(PayOrder::getBizOrderNo, bizOrderNo)
.one();
}
}
|
数据库
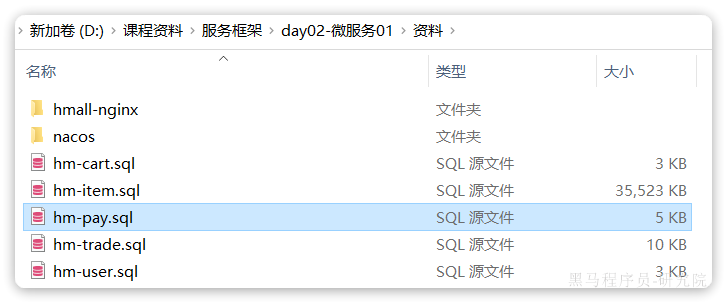
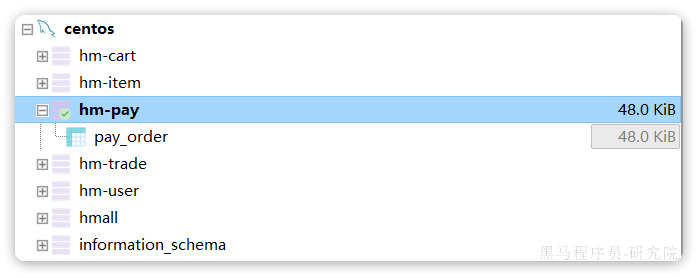
pay-service 也需要自己的独立的 database,向 MySQL 中导入课前资料提供的 SQL:
导入结果如下:
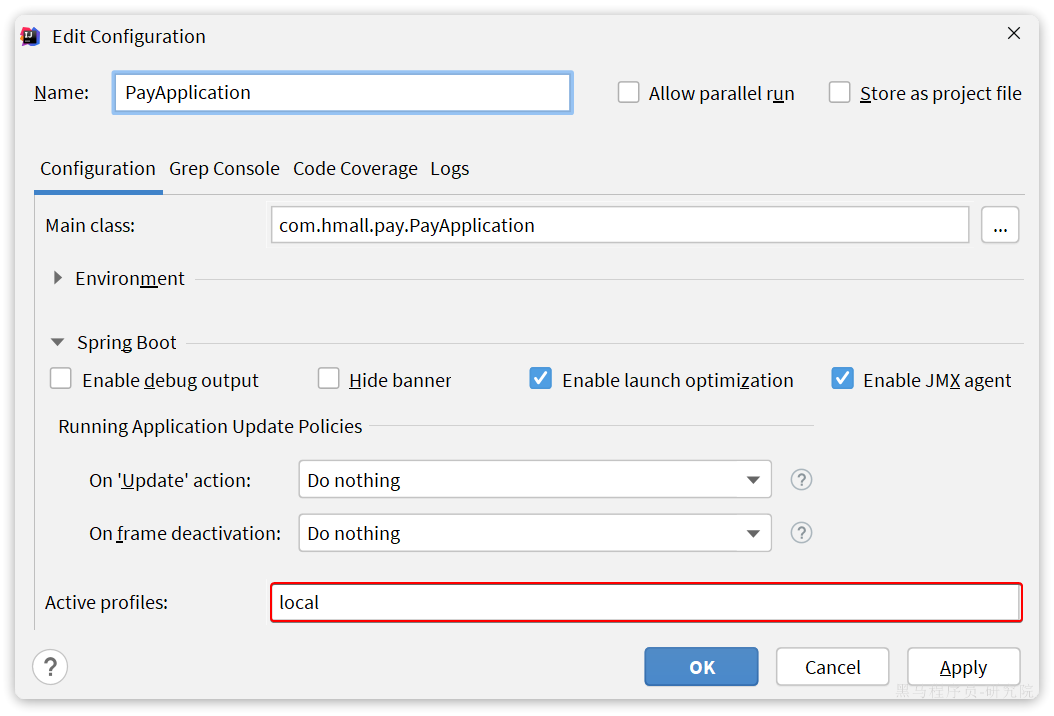
配置启动项
给 pay-service 配置启动项,设置 profile 为 local:
测试
在支付服务的 PayController 中添加一个接口方便测试:
1
2
3
4
5
| @ApiOperation("查询支付单")
@GetMapping
public List<PayOrderVO> queryPayOrders(){
return BeanUtils.copyList(payOrderService.list(), PayOrderVO.class);
}
|
启动 PayApplication,访问 http://localhost:8086/doc.html,测试查询订单接口:
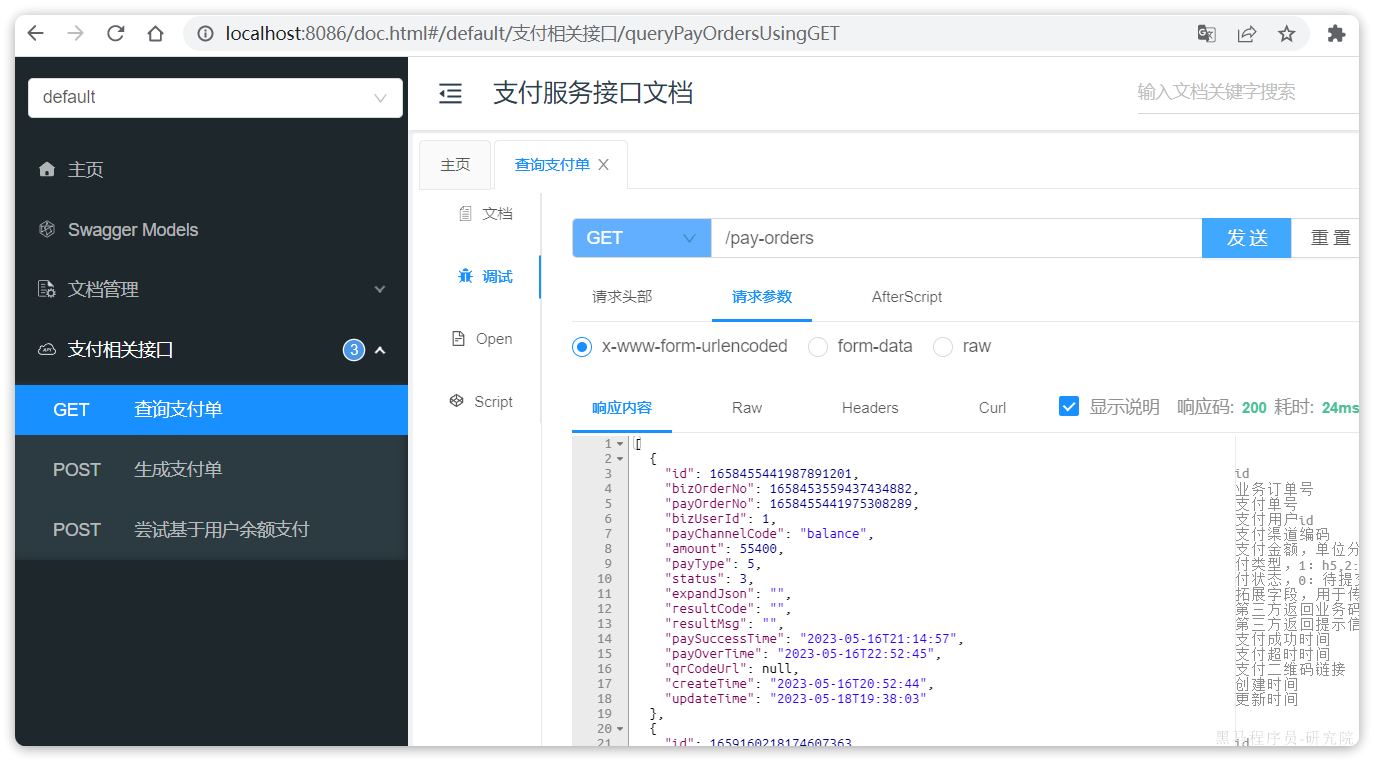
支付服务测试通过。